Building a Solid Wood Floating Desk That Actually Hides Workspace Cables
 Pedro Arian Viena··Updated February 10, 2026·25 min read
Project Specifications & Materials
Three years ago, I built what I thought was the perfect floating desk. From the front, it looked incredible. A thick walnut top seemed to float off the wall, there wasn't a single leg underneath, and the whole office suddenly felt twice as big. Then I sat down. Within about five seconds, my knees found the power strip I'd screwed under the desktop. My monitor cables hung like jungle vines, the laptop charger refused to stay clipped in place, and every time I unplugged something, another cable fell loose. It looked clean in the photos. It was a disaster to actually use. That's when I realized almost every floating desk tutorial online has the same blind spot. They spend hours talking about joinery, edge profiles, finishes, and wall brackets, then hide the cable management in one sentence: "Just attach a cable tray underneath." No. That doesn't solve the problem—it just moves the mess six inches lower. When I rebuilt the desk a few months later, I approached it differently. Instead of asking "Where can I hide the cables?", I started asking "Where do the cables naturally want to go?" That completely changed the design. Instead of hanging accessories underneath, I routed channels directly into the wood, built a hidden compartment across the back of the desktop, and made the desk itself part of the cable management system. After using that setup every day for the past few years, there are only two cables you can actually see: the monitor power cord before it disappears into the desk, and the single power cable leaving the wall. Everything else is invisible. If I were building another floating desk tomorrow, I'd follow almost exactly the same process. Here's how I'd do it.
Don't Cheap Out on the Wood
I know MDF is tempting. It's flat, inexpensive, easy to paint, and every home improvement store has stacks of it ready to load into your truck. I stopped using it for desks after my second build. Here's why. A floating desk isn't supported by four legs. Every pound of weight is transferred into the wall brackets. That means the desktop is constantly resisting bending forces. Throw two monitors, a pair of studio speakers, a laptop, your elbows, a coffee mug and maybe a cat that insists on sleeping beside your keyboard, and the loads add up surprisingly fast. Solid hardwood simply handles that kind of abuse better. If budget isn't a major concern, white oak would probably be my first choice. It's heavy, ridiculously strong, and stays stable even when humidity changes throughout the year. Walnut is my personal favorite, mostly because I love how little effort it takes to make it look expensive. A coat of hardwax oil and it almost finishes itself. Maple is another fantastic option if you like brighter furniture, although it can be frustrating if you're planning to stain it. Maple has a habit of absorbing stain unevenly unless you know exactly what you're doing. Ash is probably the most underrated species for projects like this. It machines beautifully, costs noticeably less than walnut in many areas, and has enough strength that I never worry about long-term sagging. Personally, I'd avoid softwoods unless you're intentionally going for a rustic look. Pine dents if you look at it the wrong way.
Thickness Matters More Than Most People Think
One thing I notice in a lot of YouTube builds is people using a single 3/4-inch board because that's what the lumber yard had available. Can it work? Sure. Would I do it again? Probably not. The first floating desk I built used a 3/4-inch laminated panel. It survived. But every time I leaned on the front edge, I could feel the tiniest amount of flex. Nobody else noticed it. I noticed it every single day. When I rebuilt the desk, I glued up enough stock to finish at roughly 1½ inches thick. The difference wasn't subtle. It felt like permanent furniture instead of something mounted to drywall. That extra thickness also gave me enough material to route cable channels without worrying about weakening the desktop. If you're investing this much time into a custom build, adding another three-quarters of an inch of hardwood is money well spent.
Before You Cut Anything, List Every Device You Actually Own
This sounds obvious. Almost nobody does it. Most people build the desk first. Then they buy another monitor. Then a USB hub. Then better speakers. Then a docking station. Then suddenly they're wondering where seven extra cables came from. Before I even opened the glue bottle, I grabbed a notebook and wrote down everything that would eventually live on the desk. Mine looked something like this:
- Two 27-inch monitors
- Laptop dock
- Mechanical keyboard
- Wireless mouse receiver
- Studio speakers
- Webcam
- Microphone
- USB charger
- Ethernet connection
- Desk lamp
- Stream Deck Then I drew rough lines showing where every cable wanted to travel. Nothing fancy. Honestly, it looked like something a five-year-old would sketch. But that ugly drawing saved me from drilling holes in the wrong places later. One thing I learned after building several desks is that cables rarely move. Your monitor cable will probably stay in the exact same place for the next five years. So instead of designing around today's empty desktop, design around tomorrow's permanent setup. Future you will be grateful.
Think Like Water
This is probably the easiest way to plan cable management. Imagine every cable is a small stream flowing toward one destination. Don't fight that flow. Help it. Every cable should have a natural path with as few sharp turns as possible. Monitor cables flow backward. Keyboard cables usually move straight toward the rear edge. Laptop docks often sit off to one side. Phone chargers almost always live near the front corner. Once you stop thinking about cables individually and start thinking about where they naturally collect, routing becomes surprisingly simple. That's exactly how I planned the underside of my desk. Instead of one giant trench carved across the bottom, I made several smaller channels that gradually merged together near the rear compartment. It almost looked like tiny rivers feeding into a lake. That wasn't intentional at first. But it ended up making maintenance much easier because I could identify each cable path immediately without opening the entire system.
The Biggest Mistake I Made on My First Build
If I can save you from repeating one mistake, let it be this. Don't install the wall brackets first. I know it feels productive. You want to see something hanging on the wall. I did exactly that. Then I realized one bracket landed directly underneath the hole where my monitor cables needed to pass through. I stared at it for about ten minutes hoping physics would somehow change. It didn't. I ended up removing the entire support system, patching unnecessary holes in the wall, repainting the area, and starting over. Now I do the opposite. I finish the desktop first. Every cable route. Every hole. Every channel. Every hidden compartment. Only after all of that is finished do I mark the wall and position the mounting hardware. It's a slower process on day one. It's much faster than rebuilding half the project later.
Building the Hidden Cable System Before the Desk Goes on the Wall
The cable management system is where this project stopped feeling like "a floating desk" and started feeling like custom furniture. Honestly, the desktop itself wasn't the hard part. Gluing up hardwood panels? That's woodworking. Routing a nice round-over on the front edge? Also woodworking. Figuring out where twenty different cables need to disappear without creating a nightmare six months later? That's the part nobody talks about. I spent more time staring at the underside of this desk than the top. It sounds ridiculous until you realize you'll almost never see the top clutter-free if the bottom is an afterthought.
I Didn't Want a Cable Tray
Every DIY video seems to end the same way. Someone screws one of those black metal cable baskets underneath the desk and calls it "hidden cable management." Technically... Yes. Practically... Not really. You still see the basket from certain angles. Dust builds up inside it. Changing one cable means wrestling with every other cable. And if your desk floats without legs, that basket becomes the first thing your eyes notice when you walk into the room. I wanted something completely different. If someone crouched down beside my desk, I wanted them to wonder where all the wiring had gone. That meant building the storage into the desk itself.
Building the Rear Cable Compartment
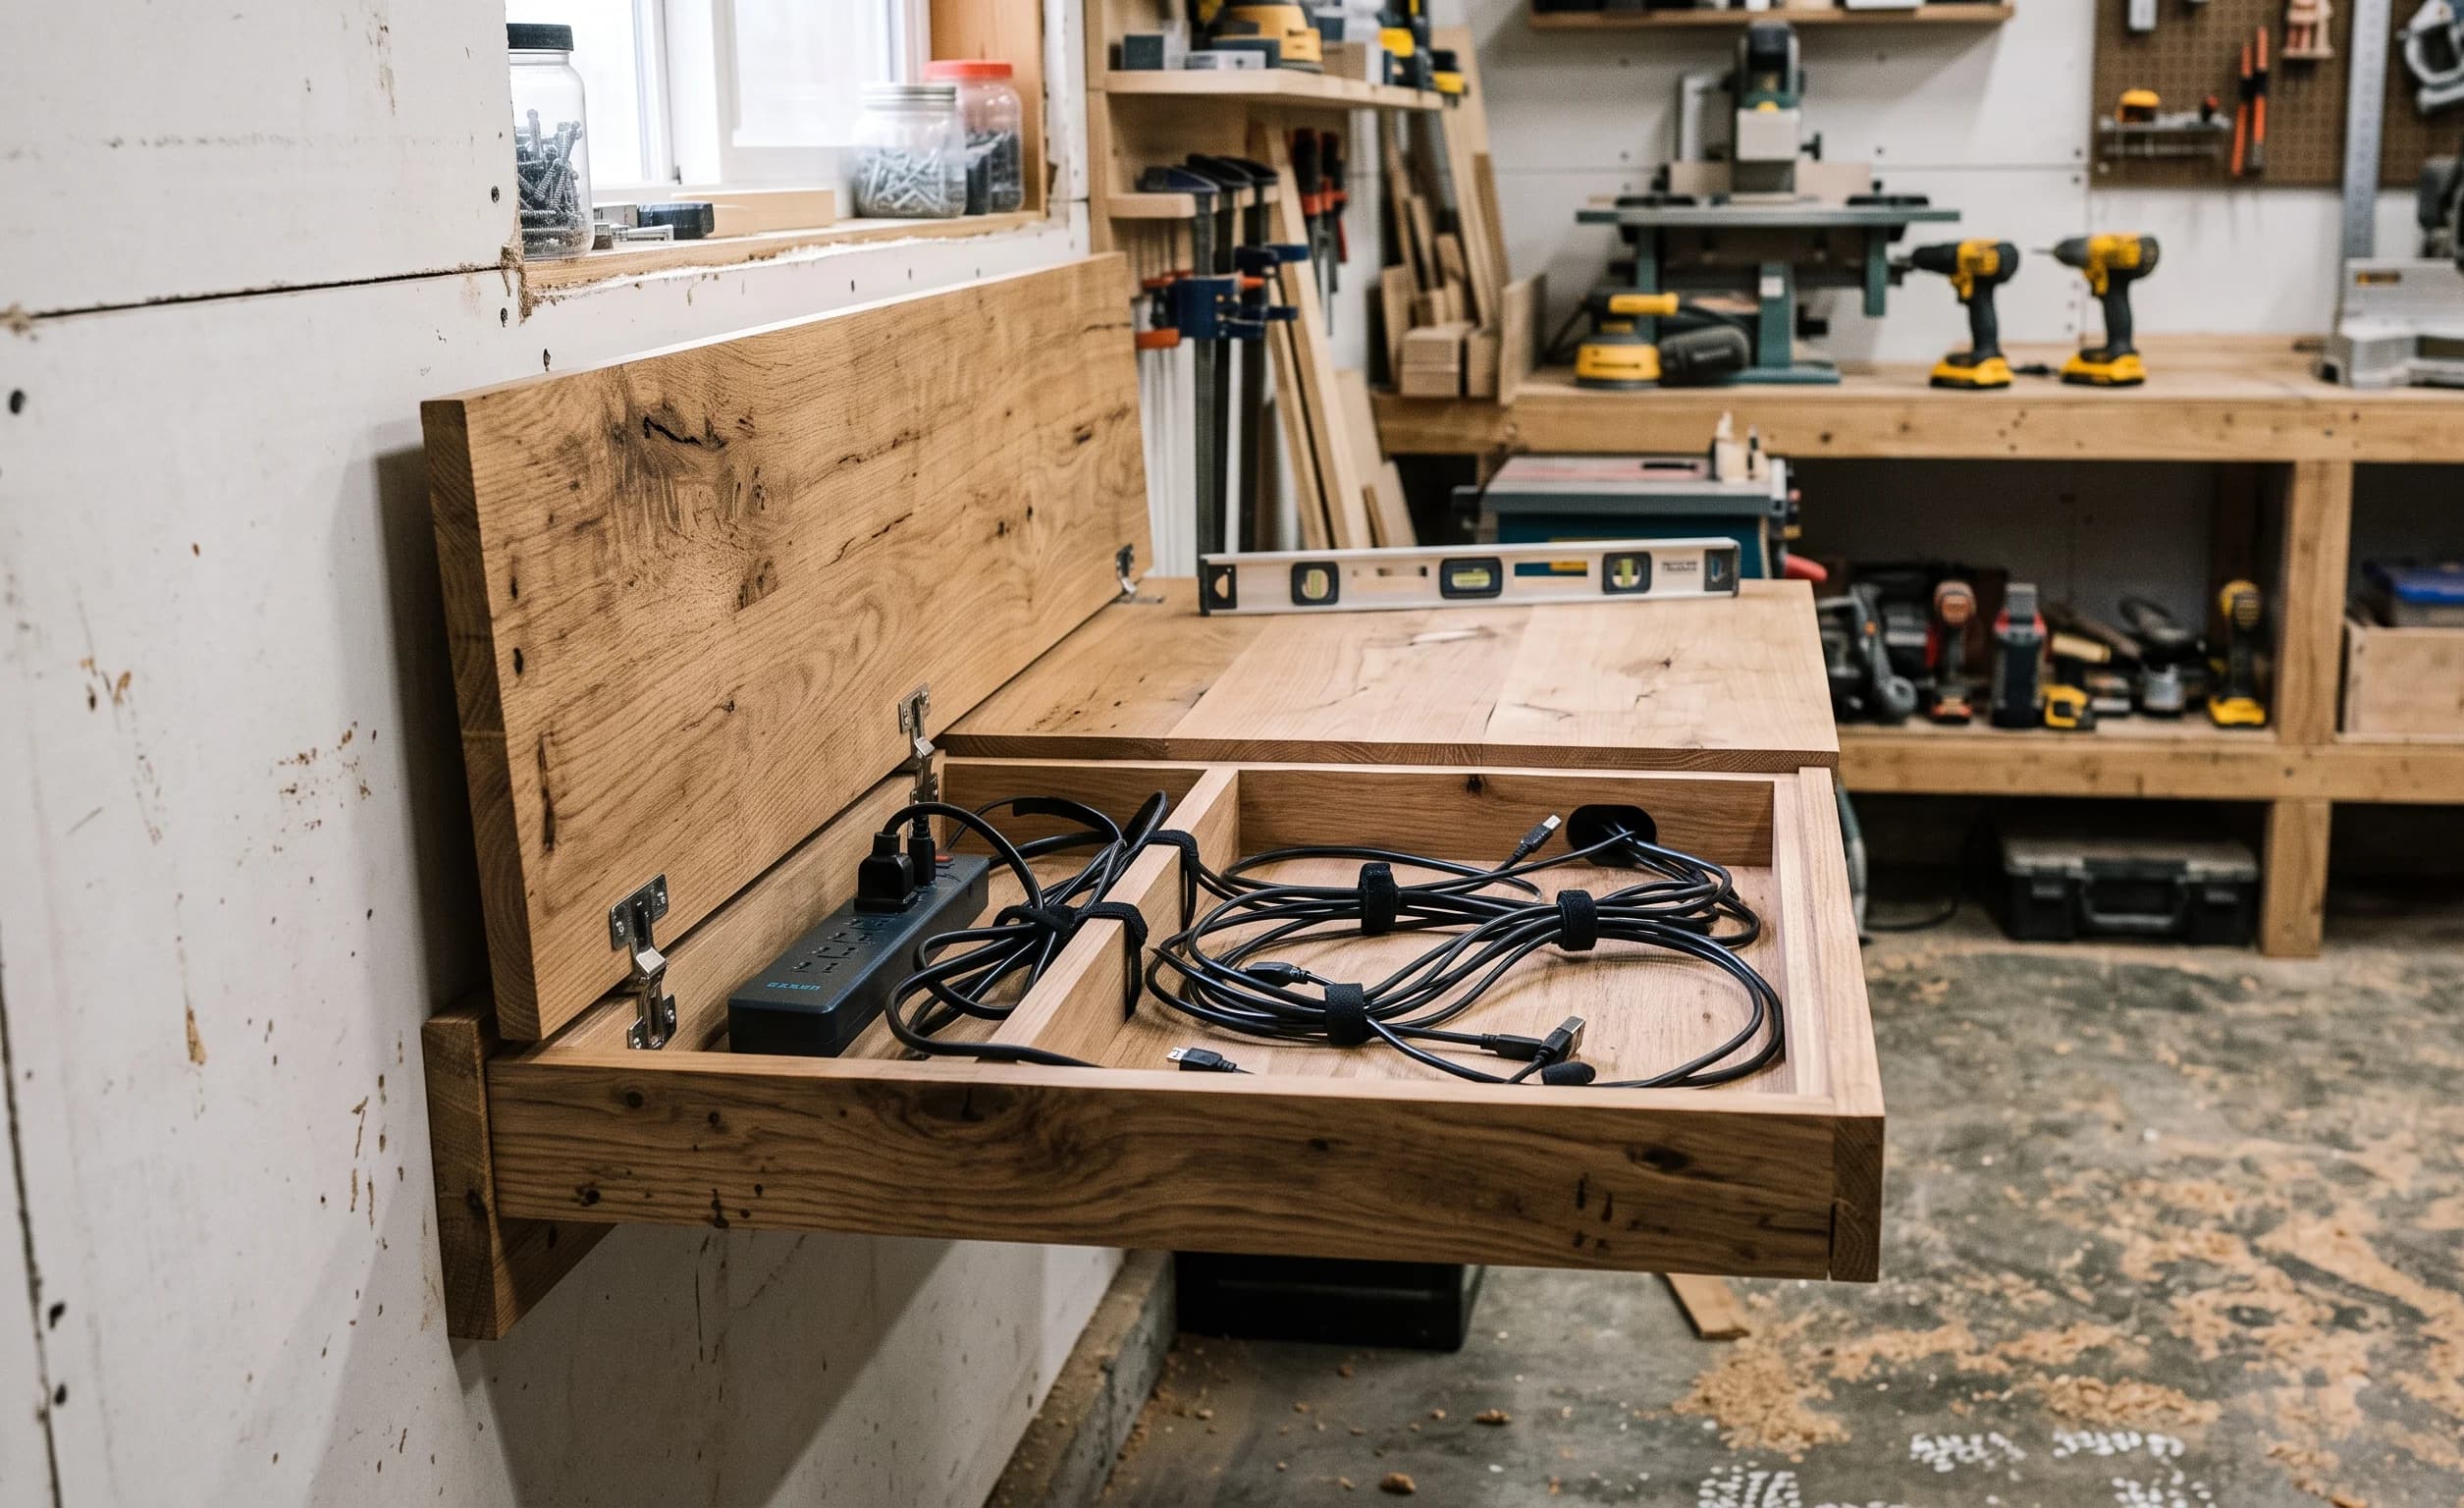
The back five inches of my desktop became its own little mechanical room. Instead of routing one giant pocket into the slab—which would have removed far too much material—I built a shallow cavity underneath using matching hardwood. Think of it like a long wooden box attached beneath the rear edge. From above, you can't tell it's there. From your chair, you can't tell it's there. But inside, it holds almost everything that normally makes a workspace look messy. Mine currently hides:
- A surge protector
- Thunderbolt dock
- Two monitor power supplies
- USB charging hub
- Smart plug
- Extra Ethernet cable
- About six feet of cable slack that I refuse to throw away because "I might need it someday." That last part probably says more about me than the desk.
Give Yourself More Space Than You Think You Need
One mistake I almost made was building the compartment just large enough for the equipment I already owned. That would've been a mistake. Technology changes faster than furniture. When I built the desk, I had one monitor. A year later, I bought a second. Then I switched docking stations. Then I upgraded my speakers. The compartment stayed the same. Thankfully, I'd left enough empty space that every upgrade fit without modifying the desk. As a rule of thumb, I try to leave at least thirty percent of the compartment empty after everything is installed. Right now, it feels like wasted space. Two years from now, it probably won't.
Routing the Cable Channels
This was probably the most satisfying afternoon of the entire project. There's something oddly relaxing about watching a plunge router cut perfectly straight grooves into hardwood. I laid out every cable path in pencil first. Not because I don't trust measurements. Because routers don't forgive optimism. The channels themselves weren't particularly deep—just enough to let the cables sit below the surface without getting pinched. Rather than making one oversized groove, I cut several smaller ones. Looking back, that was one of the better decisions. Each channel has a job. One carries monitor cables. Another handles USB devices. Another is reserved for power. Months later, if I need to replace something, I already know exactly where to look. No guessing. No pulling random cables hoping one moves.
Here's a Mistake I Almost Paid For
Routers have a way of making you overconfident. Everything feels easy. The cuts are clean. The tool sounds happy. Then you decide to remove just a little more material. Don't. On one section near the rear compartment, I thought another eighth of an inch would make routing easier. Instead, I got dangerously close to weakening the desktop. Nothing failed. But afterward I measured the remaining thickness and realized I'd left myself far less margin than I intended. Since then, I've had one personal rule: If I catch myself thinking, "One more pass won't hurt," I stop. Usually that's exactly when mistakes happen.
Drilling the Cable Openings
The visible holes on top of the desk should almost disappear once everything is installed. That's the goal. I positioned mine directly behind the monitor stands and beside the laptop dock. Once the equipment was in place, you had to lean over the desk to notice the openings. Use a Forstner bit here. The clean edges are worth it. Spade bits tear fibers. Hole saws leave rough edges. Forstner bits cut slowly, but they leave holes that actually look intentional. A Quick Warning I Learned the Hard Way Here's something I wish someone had told me. A large Forstner bit cutting through inch-and-a-half white oak gets hot. Really hot. The first hole I drilled started producing thin wisps of smoke before I even reached halfway. For about three terrifying seconds, I thought I'd ruined the desktop. Turns out my drill was spinning far too fast. Now I drill large holes at a much lower speed. Every few seconds I pull the bit out completely, clear the chips, let some air cool everything down, and continue. The hole takes an extra minute. The wood stays beautiful. That's a trade I'll make every time.
Don't Forget About Heat
This part almost never gets mentioned in floating desk tutorials. Power bricks generate heat. Docking stations generate heat. USB hubs generate heat. Even modern phone chargers can get surprisingly warm during fast charging. If you build a perfectly sealed compartment, congratulations—you've accidentally built a tiny oven. Mine has several ventilation slots hidden underneath the rear edge. Nobody notices them unless they're lying on the floor. But warm air naturally escapes through those openings, while cooler air enters from below. Simple. Silent. No fans. No moving parts. Three summers later, nothing inside has ever overheated.
I Stopped Using Zip Ties
For years I zip-tied every cable. It looked neat. Until I needed to replace something. Then I'd spend fifteen minutes cutting plastic ties, trying not to nick expensive cables, before replacing them with... more zip ties. Eventually I switched to reusable hook-and-loop straps. Best decision I ever made for cable management. They're slightly bulkier. I don't care. Being able to rearrange an entire workstation without reaching for side cutters is worth every extra millimeter. If you've ever upgraded a monitor and realized its power brick is twice the size of the old one, you'll understand why flexibility matters.
Leave Slack—Future You Will Thank You
This one feels wrong at first. Everyone wants perfectly tight cable runs. I used to. Then I slid my monitor six inches to the left one afternoon. Every cable immediately went tight. One HDMI connector actually popped halfway out. Since then, every cable gets a little breathing room. Not enough to create loops hanging everywhere. Just enough that I can move equipment around without disconnecting anything. It's one of those details nobody notices when it's done correctly. But you definitely notice when it isn't.
Before You Even Think About Finish... I know the temptation. At this point, the desk finally looks like a desk. You want to sand it smooth, wipe on finish, and admire it. Don't rush. This is the moment to assemble everything temporarily. I literally placed every device on the unfinished desktop. Both monitors. Laptop. Keyboard. Speakers. Dock. Microphone. Everything. Then I routed every cable exactly as if the desk were already finished. Within ten minutes, I found two problems. One monitor hole was about two inches too far left. The Ethernet channel needed to be wider because I'd switched to a thicker shielded cable. Neither fix took more than fifteen minutes. If I'd discovered those problems after applying three coats of finish, I would've been furious. Dry fitting isn't exciting. Neither is repainting a wall because you drilled in the wrong place. Sometimes the boring steps save the expensive ones. Finishing the Desk, Mounting It, and Finally Getting Rid of the Cable Mess I'll admit something that probably annoys a lot of woodworkers. I enjoy building furniture a lot more than I enjoy finishing it. Give me a router, a table saw, and a pile of rough lumber, and I'll happily spend an entire weekend in the shop. Ask me to spend three days applying finish, waiting for it to cure, sanding between coats, and trying not to get dust nibs in the final surface... That's where my patience starts running out. Unfortunately, the finish is what you'll touch every single day. Rush it, and you'll be reminded of it every morning when your wrist slides across the desktop. So this time, I forced myself to slow down. I'm glad I did.
I Skipped Stain Completely
Originally, I planned to stain the desktop a darker walnut color. Then I wiped the surface with mineral spirits to preview the grain. That changed my mind immediately. The white oak already looked incredible. The grain had far more character than I expected, and adding pigment would've hidden a lot of those details. That's something I think people underestimate. Not every piece of wood needs help. Sometimes the best finish is simply the one that gets out of the way. If you've invested in good hardwood, let it look like hardwood.
Hardwax Oil or Polyurethane?
This question comes up constantly. I've used both. I like both. But they solve different problems. For this desk, I went with hardwax oil. Not because it's trendy. Because I know myself. I'm going to scratch this desk eventually. Maybe with a keyboard. Maybe with a camera tripod. Maybe because I'll inevitably drag some heavy tool across it while building something else. With polyurethane, repairing one damaged area usually means refinishing a much larger section. Hardwax oil is much more forgiving. A light sanding and another coat usually blend in well enough that nobody notices. If I were building a desk for a commercial office where dozens of people used it every day, I'd probably choose a high-quality polyurethane instead. For my own workspace, easy maintenance won.
Sanding Between Coats Isn't Optional
I tried skipping this once. Once. The finish looked decent from six feet away. Up close, it felt like sandpaper. Tiny dust particles had settled into the surface, and because I hadn't knocked them down between coats, each layer simply locked them in. Now I sand every coat lightly. Not aggressively. Just enough that the next layer has a perfectly smooth surface to grab onto. It's one of those jobs that's boring while you're doing it but impossible to ignore if you don't.
Don't Ignore the Underside
This is another shortcut I used to take. Nobody sees the bottom of the desk. So why waste finish? Because wood doesn't care which side is visible. Humidity reaches both faces. Leaving the underside unfinished won't instantly ruin the project, but sealing both sides helps the wood react more evenly to seasonal moisture changes. I also finished every cable channel and the inside of the rear compartment. That turned out to be surprisingly useful. Raw wood inside enclosed spaces attracts dust much more than finished surfaces. Now, when I vacuum the compartment every few months, everything wipes clean in a couple of minutes.
Installation Day Was Way More Stressful Than Building It
There's something nerve-racking about lifting a heavy hardwood desktop toward a freshly painted wall. One slip. One accidental bump. One dropped corner. Weeks of work suddenly have a dent. I asked a friend to help. Honestly, I should've asked sooner. Trying to mount a six-foot hardwood desktop alone is one of those ideas that sounds possible until you're actually balancing forty or fifty pounds while trying to line up hidden brackets you can't even see. Two people made the job almost easy. One guided. One lifted. The desk slid into place on the first attempt. I wish every project ended that smoothly.
The Moment Everything Started Looking Finished
Once the desktop was mounted, the room still looked... unfinished. Cables hung everywhere. Power bricks covered the floor. The monitors weren't connected. For about half an hour, it actually looked worse than before. Then I started routing everything into the hidden compartment. One cable at a time. Monitor. Power. USB. Ethernet. Speakers. Dock. Microphone. Webcam. Every time another cable disappeared into the wood, the room looked a little cleaner. About an hour later, I stepped back. The transformation was honestly bigger than I expected. Without visible wiring, your eyes stop focusing on equipment. Instead, they notice the desk itself. The floating effect suddenly becomes obvious because nothing underneath distracts from it.
I Labeled Every Cable... and Future Me Is Grateful
I know labeling cables sounds obsessive. I thought so too. Until my docking station died. Replacing it took maybe ten minutes. Figuring out which USB-C cable belonged where would've taken another thirty if everything had been unlabeled. Now every important cable has a small tag. Nothing fancy. Just simple labels like:
- Left Monitor
- Right Monitor
- Dock Power
- Ethernet
- Webcam
- Speaker Left
- Speaker Right Nobody will ever see them. That's not the point. They're for the version of me that's tired on a Tuesday night trying to troubleshoot why one monitor suddenly refuses to wake up.
One Thing I Didn't Expect
The clean desk actually changed how I worked. That sounds dramatic. But clutter has a weird psychological effect. Before rebuilding the desk, I'd constantly find random adapters, loose cables, external drives, and chargers sitting around because there wasn't a logical place to put them. Now they disappear into the rear compartment as soon as I'm finished using them. The desk stays clean almost by accident. I wasn't expecting a woodworking project to improve my workflow. It did.
The First Upgrade Happened Six Months Later
This was the real test. Building something is easy. Living with it tells you whether the design actually works. About six months after finishing the desk, I upgraded both monitors. Larger screens. Different stands. Completely different cable layout. I expected to spend half a day rerouting everything. Instead, I removed the magnetic cover, loosened a few hook-and-loop straps, swapped the cables, closed the compartment, and went back to work. Maybe twenty minutes total. That was the moment I knew all the planning had been worth it. The hidden compartment wasn't just cleaner. It made future upgrades easier. That's something no cable tray has ever done for me.
The One Detail Visitors Always Notice
People usually expect someone to comment on the wood. Or the floating design. Or the finish. Almost nobody does. Instead, they ask the same question. "Where are all your cables?" I usually smile because they're standing less than two feet away from them. They're just looking in the wrong place. The entire cable management system disappears so naturally that most people assume everything on the desk must be wireless. It isn't. There are more than a dozen cables running through it. You just can't see them. And honestly, that's exactly how I wanted it. What I'd Do Differently Today (And Why I'd Never Build Another Floating Desk Without Hidden Cable Management) I've been using this desk long enough that the honeymoon phase is over. The photos were taken years ago. The excitement of finishing the project disappeared a long time back. Now it's just... my desk. And honestly, I think that's the best possible test for any DIY project. A lot of builds look fantastic for a weekend. Very few still make sense after you've sat at them eight hours a day for a couple of years. This one passed that test. Not because every decision was perfect. Because the small mistakes taught me what actually matters.
The Things I'd Change If I Built It Again
Surprisingly, the list isn't very long. I'd probably make the desktop about two inches deeper. When I built it, I was using 24-inch monitors. Now I'm using larger displays, and having a little extra viewing distance would be nice. I'd also install threaded inserts anywhere accessories might eventually mount. Back then, I wasn't thinking about monitor arms. Now I'd absolutely plan for them from day one. And if I had one luxury upgrade? Integrated wireless charging. The technology has improved enough that many chargers can transmit power through a surprisingly thin section of wood. I'd test everything on scrap first, but hiding a phone charger completely inside the desktop is definitely on my list for version two.
Things I Wouldn't Change
The rear cable compartment. Not a chance. If anything, I'd make it slightly larger. Every year it seems like another little power brick finds its way into my office. Laptop charger. Camera battery charger. Headphone dock. USB hub. You never seem to own fewer electronic devices over time. Only more. Having extra room means I don't have to play cable Tetris every time something new arrives. The routed cable channels also worked exactly the way I'd hoped. Nothing has shifted. Nothing rattles. Nothing gets pinched. That's one of those features you stop noticing because it simply works.
A Few Maintenance Habits That Keep It Looking New
People often ask how much maintenance a solid wood desk requires. Honestly? Less than I expected. Every week or so, I wipe the surface with a microfiber cloth. If I've been careless with coffee—which happens more often than I'd like—I use a lightly damp cloth followed immediately by a dry one. That's about it. Once or twice a year, I empty the rear compartment and vacuum out the dust. It usually takes less than ten minutes. While everything is open, I also check that none of the cables have rubbed against sharp edges or become unusually warm. So far, nothing has. If you use hardwax oil like I did, refreshing the finish every few years is straightforward. That's another reason I chose it. Furniture shouldn't become a restoration project every time it gets a scratch.
One Lesson That Has Nothing to Do With Woodworking
This project taught me something I wasn't expecting. Convenience almost always beats perfection. Originally, I had this vision of every cable being perfectly straight. Perfect ninety-degree turns. Equal spacing. Everything tied down like a server rack. It looked fantastic. For about two weeks. Then I bought a new webcam. Then another microphone. Then an external SSD. Eventually I accepted reality. A workspace changes. Constantly. The goal isn't creating a system that never changes. It's building one that's easy to change. That's why I stopped using zip ties. That's why I left extra room inside the compartment. That's why I gave every cable a little slack. Flexibility turned out to be more valuable than perfection.
Is It Actually Strong Enough?
This is probably the question I get asked most often whenever someone sees photos of the desk. "Doesn't it sag?" Not even a little. At least, not so far. The answer has much less to do with the wood and much more to do with the support system. A floating desk is only as good as what's hidden inside the wall. Mine is anchored directly into wall studs with heavy-duty steel brackets, and the load is distributed across multiple mounting points. I've leaned on the front edge. I've stood on it briefly while installing shelves above it. I've accidentally dropped toolboxes onto it. It's survived everything without complaining. That doesn't mean every floating desk can do the same. If the brackets aren't installed correctly, the nicest hardwood in the world won't save the project. Build the invisible structure first. Everything else depends on it.
Was It Worth the Extra Work?
Without question. If I had followed one of the simpler tutorials online, I probably would've finished the project an entire day earlier. I also would've spent the next several years staring at a bundle of dangling cables every time I sat down. Instead, the extra routing, planning, and head-scratching happened once. I haven't had to think about cable management since. That's a trade I'd make again without hesitation.
If You're Planning Your Own Build
Don't copy my measurements. Copy the process. Your room is different. Your equipment is different. Your workflow is different. Maybe you use one ultrawide monitor instead of two displays. Maybe your desktop PC sits beside the desk instead of underneath it. Maybe you're building a compact workstation for an apartment where every inch matters. Those details should change. The underlying idea shouldn't. Plan the technology before you cut the wood. Not afterward. The desk should support the way you work—not force you to adapt to its limitations.
I still catch myself looking underneath the desk every now and then. Not because something needs fixing. Mostly because I remember what used to be there. The old version had a power strip hanging on two screws, cables tied together with cheap plastic zip ties, and enough clutter to collect dust by the handful. This one is different. The monitors turn on. The laptop connects. Everything charges. Nothing hangs below the desktop. The workspace just... works. And after living with both versions, that's probably the biggest compliment I can give this build. It quietly gets out of the way. That's exactly what good furniture is supposed to do.
About the Author

Pedro Arian Viena
Maker & Furniture Designer
Craftsman and home designer passionate about solid wood joinery, custom furniture fabrication, architectural built-ins, and local smart home automation. I write detailed guides on building beautiful, functional living spaces.